In the last few months, I've been interested in learning how to put my SLR to better use. Let's face it, 99% of the pictures I take with it are on auto. What's the point of having a an SLR if you're just using it as a point and shoot? So I read the manual and started to poke around on the net. I first wanted to do some exposure shots or maybe something with a cool blur effect. What I settled on was a night shot with some blurred lights. My Canon makes this pretty easy for beginners by including a mode called shutter priority which allows the photographer to adjust the shutter and the camera will adjust the rest (aperture, white balance, etc..) itself. This is pretty cool, because all I have to worry about is framing the shot and keeping the camera still. As you can see, I got some pretty good results:
I digress however, as this post is to talk about a shot that took quite a bit longer to get together: a 20k pixel panorama of Denver's front range. Because the picture is so large, you can decide if you want to load it or not:
To set this shot up, I found a high point (of which there are many around these parts), set up my tripod, and then started taking picture from left to right overlapping about 10% of each shot. At first I did this on full auto mode, but then I decided to go all manual, because the contrast varied too much between each picture which adds a lot of post processing time. After I was satisfied I had enough pictures, I headed home.
When I got home, I decided to fire up The Gimp and see what I could do. As it turns out, unlike Photoshop, The Gimp doesn't have a quick way to create panos. out of the box. Also, unlike Photoshop, The Gimp has a ton of free plug-ins that do everything you can imagine. So after about one second of Googling, I found a plug-in called Pandora. The site has the download and a easy to follow tutorial on stitching your picture together. Using the tutorial, and about a hour of my time, I figured out how to stitch these bad boys together. I even started getting "advanced" and adjusting the contrast and brightness as well as rotating and cropping.
So I was able to put together a really nice picture with about 4 hours of my time and I got some exercise to boot. Now that I have the technique down, I hope to hone my skills and I expect the next shot to look even better.
An application launcher is a little piece of utility software that runs in the back ground of the OS and waits for a key combination to be pressed. Once you hit that combination (say alt + space), a little window pops up that allows you to start typing. You can then type the first few letters of the app you want to launch, and then hit enter and the app will pop up. This allows you to launch apps without taking your hand off the keyboard. For people like me (who live and die by shortcuts), this is the promised land. Many of these app launchers can be configured to open folders, search the hard drive, and many more tasks with endless plug-ins.
There are a number of apps that do this, as listed on Wikipedia, but I'll talk about the three that I've used/use on a daily basis. First there's Launchy. Launchy is a free (as is freedom), utility that runs on both Windows and Linux and has plug-in support as well as configurable key combos. I use this everyday at work and have very few problems with it. The app will "learn" your favorites as you pic them out of a list, so you won't need to pick them the second time around. Some plug-ins you may be interested in are: putty integration, weby, and one I've recently started using, Google calc. From my experience, this app works as well on Linux (Ubuntu) as it does on Windows.
Next up is Quicksilver for Mac OS X. This is the best application launcher around in my opinion. It is very polished and not only searches, and launches well, but has all the visual crack you need and love on OS X. Quicksilver also supports plug-ins, and has many configurable preferences; not to mention you can tweak the look and feel.
Lastly, we have a Linux (KDE) only option known as Katapult. This is my least favorite option out of the bunch. And being a Linux hippy, I hate to admit that there is a Mac option that I like better. It works well enough, but it doesn't learn my preferences, which kind of gets annoying. It is skinable and about the same configuration options as Launchy.
Anyway, once you start using one of these fabulous applications, you'll find it painful to go back. I have one of these installed on every box that I use regularly, and I find that I can work much more efficiently.
With this post, I'll be taking a cue from my friend Stu over at Corrosive Content, and posting something helpful. At work I often run into obscure problems that take a lot of time to solve. Because I work on Windows, Mac, and various other Unix flavors, I get a chance to see the worst each operating system has to offer. This little "bug" is one of those neat bugs that just doesn't seem like it can actually be true.
You run a df and notice that your /tmp directory is full. No problem, just cd /tmp and then see what's in there. After listing the files, you notice that there are a lot of .shitty files in the directory and you know you can delete those. No problem, a quick rm *.shitty should do the trick...Only one problem, you run the command and you get this cute little message:
Argument list too long
What? Let's just list the files and see what this is all about: ls *.shitty
Argument list too long
You've got to be kidding right? As it turns out, there is a limited size buffer created for shell commands and rm *.shitty actually expands to rm 1.shitty 2.shitty 3.shitty, which quickly becomes too big for the command line. Here are a few options I came up with:
The simplest answer is to do something like this:
find . -name "*.shitty" | xargs rm
This doesn't work if you have spaces in the names of the .shitty files or if the .shitty files have special characters. So you should do this:
find . -name "*.shitty" -print0 | xargs -0 rm
And finally, an extra little tid bit...Say you are in a parent directory and you want to get rid of all the files in a set up children directories:
This will go through all the directories in the current directory and look for *.shitty files in the FunctionTests/InputData folders under them. The option that is special here is the -wholename option. If you try to do this with -name, you will get an error or on some versions of find, you will get unexpected results.
I've always been fascinated with time lapse videos of all sorts. Recently I've had the urge to do a little time lapse myself. My ultimate goal is to do something with my DSLR, but I guess you have to crawl before you walk right?
1. Get a webcam
2. Get VLC from Videolan.org (Windows, Mac, and Linux)
* if using Ubuntu type the following: sudo apt-get install vlc
This means you'll save every 10th image from /dev/video0. You'll want to replace that with where ever your webcam is. It'll most likely be under /dev/video, but you can use dmesg to find your cam.
5. Let your video run as long as you'd like (or until your hard drive fills up)
6. Stitch your images back together using ffmpeg
* ffmpeg -b 1800 -i img%06d.jpg video.mpg
After that you'll have a video named video.mpg that looks similar to the one above. You'll want to play with the number of images you grab with the image-out-ratio and you may want to explore varying the play back speed by taking a look at the options ffmpeg has to offer.
Although I had to figure out the VLC command by reading and just trying stuff, I found the ffmpeg command from: Catswhocode.com
It's also worth mentioning that I found a good article about extracting time lapse from a video. This sounds good for shooting video with my camcorder and then getting different types of time lapse from the video. You can find that article at: wp.pr0gr4gr4mm3r.com
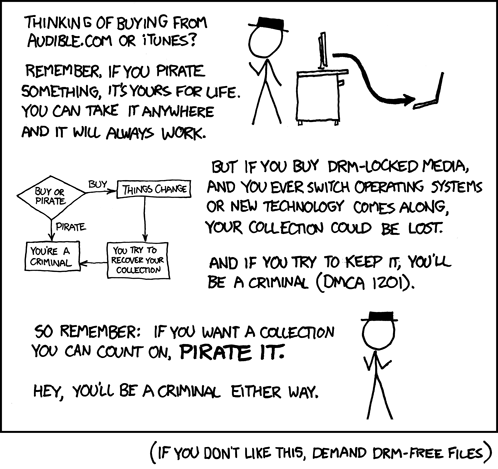
Here is my public service announcement for the day via XKCD.com:
Don't know what DRM is? If you want a full explanation then check here, otherwise just know that it's used so companies can lock you to proprietary hardware/services under the cloak of "protecting intellectual property". It sucks because most of us don't know what DRM is until we have a useless music collection...
A friend and I have been wanting to build a MAME cabinet for the last few years. Recently we decided to go ahead and jump into the deep end. We took a lot of help from the internet, but found that we had to go it alone for a large part of the build. So I decided that it would be good for the both the internet at large as well as me to document my findings.
As far as building the arcade goes we used the directions at Arcadecab.com as a guide. These are great instructions, and the only issues I have are that his parts estimate is a little off (we spent about $475 w/o the coin door) and you have to make a few assumptions on finishing stages that could be a little more clear. You may want to check out his new plans. I will say that he probably made the parts list a few years ago, and prices have more than likely gone up. Lastly, you'll want to print out the directions or have a computer handy, because you'll need to read and re-read them a few times to get the point. As far as the build goes here are a few side notes:
We didn't add the coin door so that we could save money
Don't paint anything until you get the entire thing together. It's worth taking it back apart to paint it, so you can make sure it all fits together
Think about a better way to mount the glass. We did, and it worked out great (Pics - None of these have the marquee in yet and some were with my iPhone so quality isn't the best). I'd tell you how to do it, but I'm going to focus on the software install. Email me if you have any questions, and I can help you with it.
Ok, with that out of the way I can tell you how to get your software up and running:
The first thing you're going to want to do is install your OS. I used Kubuntu and I'm going to base my directions off that, however once you get MAME installed the Wahcade directions should work for Windows.
To install Kubuntu go to Kubuntu.org. Once there, click on the download button to the left. Once you download and burn the ISO, pop it in your CD tray and restart your computer. The install is self explanatory, and there is plenty of help at the Ubuntu forums if you have any problems.
After you get Kubuntu installed, you need to install MAME. We used SDLMAME, but you could probably just as easily use XMAME.
To install MAME open a termial and type the following:
sudo apt-get install sdlmame
After you get MAME installed, you'll want to configure it. First, edit the mame.ini by doing the following:
sudo gedit /etc/sdlmame/mame.ini
You can also substitute gedit for vim or whatever you like. I'm using gedit for simplicity. The only thing we changed in here was the rom location. I took all the other directories out and put in:
~/roms/mame
I did this for a few reasons. First I want the location of my roms to be apparent because this is a community machine for work. Second, I want there to be only one location for my roms, so I know where all the roms are and lastly, I created a mame dir under roms because I may want to incorporate other emulators in the future (which Wahcade can do).
So after you save the mame.ini, you'll want to create the roms dir under you home directory by doing the following:
mkdir -p ~/roms/mame
Also, make a directory for your artwork (this is for Wahcade).
mkdir -p ~/roms/artwork/mame
We just decided to have screen shots and forgo the extra artwork. You can make the call on that and make other directories the extra artwork. Either way, you can find some artwork here.
To learn more about how to use mame either do the following:
man mame
at the console, or visit the website located here.
Now that you have MAME running, you need to get some roms. Getting roms is a grey area, so I'll leave out the specifics of where to get them, but I bet you can find some good ones here. Once you get your roms (and artwork if you want to be complete), save them in:
~/roms/mame
and
~/roms/artwork/mame
respectively. You need to make sure that the name of the screen shot matches the rom that it belongs to. This is how Wahcade will find your artwork. Next you need to configure your X-Arcade buttons in MAME. To do so, make sure your X-Arcade joystick is attached (I found that both USB and PS/2 connections worked) and type:
mame
at the command line. When you open MAME, your joystick will most likely not do much.
Use the keyboard to arrow up and down and go into the controller settings (you don't need to worry about having the arcade stick let you select games in MAME because you'll be using Wahcade). You'll want to map the player 1 buttons using the left side of the joystick and the player two buttons with the right side. All I did was map any of the up, down, right, and left key mappings to the up, down, right, and left joystick buttons. In the menu settings I also mapped the combination of first and second player buttons to exit a game. You'll want to map some kind of button combo to exit a game so you can get back to Wahcade. For some games, you'll need to map the "ball" to the joystick as well (unless you got the X-Arcade with the ball built in). After you do this, you'll want to go to each game and make sure all your controls work. You may find some don't work and you can figure out what button on the keyboard does what and then remember that and go back into the settings and map a button on the arcade pad. I also noticed that the buttons for player to seem to be opposite of player one. So I just recently switched the buttons around for player two. This is just a personal preference. You don't need to spend the time on this if you don't care. You can also map keys on a game by game basis by opening the game and pressing tab. This allows you to you a specific key combination for a certain game without having to change the global map. You can also edit the dip switch settings. You can change things like the difficulty of the game, the number of lifes, continues, etc... The settings will be different for each ROM.
Now you need to install Wahcade by doing the following:
cd ~/home wget http://www.anti-particle.com/projects/wahcade/wahcade_0.99pre3_all.deb dpkg -i wahcade*
Alternativly, you can point your browser to Anti-particle.com and find the latest version and download and install it.
Once you install Wahcade start up the Wahcade Setup Editor. You'll want to go to the "Keys" tab first and map all the up and down buttons to the up and down keys on the joystick and do the same for the left and right. All you have to do is select the function you want to re-map and then hit "enter". Then you just push the button you want to map. You can map more than one button to do the same thing. You can also map a combination of buttons to do one thing. The Setup Editor crashed on me a few times, but I just opened it back up and continued where I left off. The editor definitely needs a little more polishing, but it does the job. You can get more info on setup by going to the Wahcade site (these are for XMAME and an older version of Wahcade).
Next I went to the Emulators tab and selected MAME in the drop down. Next expand the List Generation section.
Set the ROM dir to
~/roms/mame
And set the List Generation Method to XML. Expand the Screen Saver section. I set mine to slide show and pointed it to the artwork directory. If you'd like to do a movie screen saver, then you need to find a movie you want and point Wahcade to the directory. You'll also need to install GStreamer by doing the following:
sudo apt-get install gstreamer
Next expand the Artwork section and point screen shot area to the artwork directory you created earlier (~/roms/artwork/mame). The last thing I did was go to the MAME only tab and edit the layout. I just edited the layout so it only showed the artwork that I have (screen shot in this case).
Now all you need to do is fire up Wahcade and give it a whirl. You can start it by opening up a command window and typing:
wahcade
I also created a few shortcuts on the desktop and by moving the joystick up and down, you can select it and fire it up with the player one button.
Here is a video of our arcade in action (minus the marquee):
I hope you find these directions useful and sorry they aren't more in depth. I should have created them while I was doing the work, but I didn't think about it, so I had to create them by memory. In the future, I'd like to add a history file so that we can keep high scores, add more games, and add more emulators. The arcade has been in action for about a month now, and it's a hit. It runs all the time and hasn't crashed often and is played everyday. If you have any questions or would like me to elaborate more, leave a commit or shoot me an email.
I found this new website called Scour that aggregates searches from Google, Yahoo, and MSN and lets you vote on how relevant they are. You get points for voting, commenting, and referrals that you can cash in for money. I'm an engineer and I use Google all day long so I figure why not just get paid for it? Even if it's pennies, that's more than I was making before. Sign up by clicking here (Note: this is a link that will give me referral points. Just wanted to disclose).
I have a 1st gen iPhone and have been waiting for 3rd party apps for ever now (I had it hacked for while, but I just hate that I can't get firmware updates without jumping through hoops). Today (July 11) everything was suppose to launch. And thus started my iBricking experience:
~ 5 p.m July 10th - Manually downloaded iTunes 7.7 ~ 6 p.m July 10th - Started browsing apps ~ 7 p.m July 10th - After looking through all apps...found only 4 or 5 I want ~ 7:15 p.m Got all apps downloaded 8 a.m July 11th - Opened iTunes, plugged phone in and tried to update 8:01 - Tried to upgrade again 8:02 - Tried again . . . . . 9 a.m - iTunes says there is an update...Yipeeee!!! 9:01 a.m - Started upgrade process . . . 9:30 a.m - Everything got backed up, new firmware in place, all it has to do now is authenticate 9:35 a.m - Uh oh
I've been trying to get my phone back for about an hour and a half now and it seems I'm not the only one having problems: Digg
If I find a solution for this, I'll post it.
Update: It's now 11:12 a.m and I'm still without a phone. Update # 2: 12:52 p.m - Still can't use my phone. I'm calling support listed at Apple.com
Update # 3: Still on hold, but I did find some info about it on the CNET Crave Blog
Below is what a user posted from his experience with Apple tech support:
Dear ,
Due to network congestion on the iTunes server, you may not be able to update or restore the software on your iPhone. Once the congestion has decreased the software should be available for you to update. It would be advisable to attempt the update later on today.
If you have attempted to restore your iPhone and it is currently in recovery mode, you will not be able to use your iPhone until the software has been restored or updated. A temporary solution may be to use your SIM in another AT&T phone or have your calls forwarded to a phone you have access to.
We apologize for the inconvenience this may have caused.
If you would like to voice your concerns to Apple about this, feel free to visit apple.com/feedback
Thank-you for your patience on this matter.
Regards, Your Apple Care Team
Final Update: - I was just able to activate my phone and sync my new apps. I'll let you guys know how the 2.0 firmware is and give you my 2cents on the apps soon.
You want to know why people steal music? It's because the RIAA and bands DRM their music to all hell and make it harder to buy music than to steal it. Why buy music that I can barley play when I can just download it and play it on whatever device I want and on as many devices as I want?
I bought an album from Snocap directly from MySpace from a band that I like called Kill Switch Engage. I knew the album had DRM on it, but I wanted to support the band so I bought it anyway. I use Itunes as my player, but this album has Windows DRM. This means that I can only play the album with Windows Media Player. Fine. I like the band and I didn't want to "rip them off". I played it a few times, and then forgot about it because it wasn't in my Itunes library which is what I use. Then I got a new laptop and moved all my music over. All my music played fine in Itunes (because I strip the DRM with a third party app), but I was unable to play my KSE album. Here is what I get when I try to play it:
Simple right? Just download the nice executable and be on your way. Wrong. I'm still having problems. I'm sure I can get them worked out being that I'm an engineer, but that's not the point. I shouldn't have to work anything out just to listen to the music that I bought. I can't even put the shit on my Ipod. So I emailed the band telling them I won't be buying any more of their music, and because Apple just sent a C & D to my favorite fair play stripper, I won't be buying music from Itunes anymore. So where does that leave me? Well there is Amazonmp3.com which doesn't have all the major labels, and there's Emusic which is in the same boat and also has a subscription model that I'm not so hot on. So what is an honest person to do? Looks like the people that are trying to keep me from stealing music are pushing me to start exploring my options.
After buying a new front bumper for my DII, I faced a new challenge: relocate the washer fluid bottle so that it doesn't hang below my new bumper. I first searched Discoweb.org and found a promising tutorial. I went to work, but then I realized I had extra hardware that wasn't shown in the tutorial. I went back to Discoweb, and found that others had the same problem. I saw that you could potentially use a D90 water bottle in substitution of the stock bottle. There was only one problem: I didn't want to spend the money to buy a D90 bottle that I may hack up anyway. After going back to the drawing board, I came up with a solution that was easy to install, holds lots of fluid, and most important only cost about $35 dollars in parts (You can probably get away with it for less than $15 if you have some parts around or you shop around).
It should be noted that this works with a ROVERTRACKS front bumper, and I would assume it would work with other low profile bumpers like the RoverTyme bumper, but I don't know for sure.
You will need:
Materials:
About 3 feet of poly tube to extend the stock hoses About 3 feet of wire to extend the wire for the pumps 2 large hose clamps hose clamps A 3" or 4" length of PVC 2 2" lengths of PVC 2 3" or 4" end caps (same as whatever size you got above) 2 2" 90 degree PVC bends A 2" cap with screw top A 3" or 4" coupler with 2" outlet PVC glue
Tools:
2" hole saw Saw to cut PVC Screw driver Drill and dremel (I used the dremel because I didn't have a bit big enough) Small bit for vent hole, big bit if you have it for mounting pumps
Directions:
First of all this is what you are trying to make:
This is just pieced together and the up tube isn't cut to length yet.
1. Start by lining up the 3" piece of pipe under the bumper and measuring out how much you need cut off to create a tight fit. Make sure to leave enough space for the end camps and mounting of the pumps on the end of the container.
2. Cut the 3" tube in half a third of the way down the tube on the right side.
3. Put the coupler in between the new cut. (DON'T GLUE ANYTHING YET)
4. Put the new assembly back up to the bumper to make sure you still have room for everything. You'll probably have to cut the long tube again.
5. Now put the end caps on and cut the holes in the right end of the tube. I put the pumps up to the end of the cap and marked where I needed to cut. Try not to cut the holes too big. The tighter the fit the better. Try to put the pumps to as close to the bottom of the tube as possible (this will allow you to pick up more fluid).
Note: this picture has one of the small motors and the big motor (used for old bumper sprayers. You'll use both small motors when you're ready to glue). I was just test fitting.
6. Now assemble the whole thing and test fit it. This will allow you to figure out the length of your up tube and how far over you need to go over with the 2" pipe before you need to start your up tube. I went over far enough so the up tube wasn't in front of my fan. Mark out your hole that you will cut in the fender.
7. Cut your over tube and up tube to the right size. Cut the hole in the fender.
8. Put the whole assembly back in place and make sure everything lines up.
9. Now extend your tubes and wires. You should just need to cut a length of tube (about a foot) and it will fit right in to the stock connectors and then connect to the pump. Cut off the plug that plugs into the pumps and splice in about a foot of wire.
Here is a picture:
On the left is the stock length and the right is the new length.
The tubes will run from the stock connection point through a hole and into the new location:
Here is how they connect:
I actually heated the lines a little to slide them all the way on when I ready to put the lines in place for production use.
10. Once you are sure you have the right fit, glue everything together. Make sure to be liberal with the glue and when connecting two pieces of PVC twist the two peices together (You'll have leaks otherwise). You'll also need to use some silicone when gluing the pumps in place. Make sure you use the stock rubber grommets and let the silicone dry over night.
11. Drill a small hole in the cap on the up tube so that bottle can breath.
12. Now use the bar that runs in front of the radiator to attach the new container:
Here's a few pictures of it finished:
The finished bottle:
On the truck from below:
From the front squatting:
The spout:
After I was all done, I zip tied all the lines and had to add a few to the up tube to get it just in place. I also had a small leak, and had to add more silicone. I've been using the new system for a few weeks, and it works great. I used a 3" tube for the main container, and I can hold just under a gallon. If I used 4" tube I'm sure I would have been able to hold over a gallon. You can't even see the bottle unless you squat pretty low and look. Leave a comment if you have any questions, and I can help you with anything you need.


